
Config as Code
Railway supports defining the configuration for a single deployment in a file
alongside your code. By default, we will look for a railway.toml or
railway.json file.
Everything in the build and deploy sections of the service settings can be specified in this configuration file.
How does it work?
When a new deployment is triggered, Railway will look for any config files in your code and combine these values with the settings from the dashboard.
The resulting build and deploy config will be used only for the current deployment.
The settings in the dashboard will not be updated with the settings defined in code.
Configuration defined in code will always override values from the dashboard.
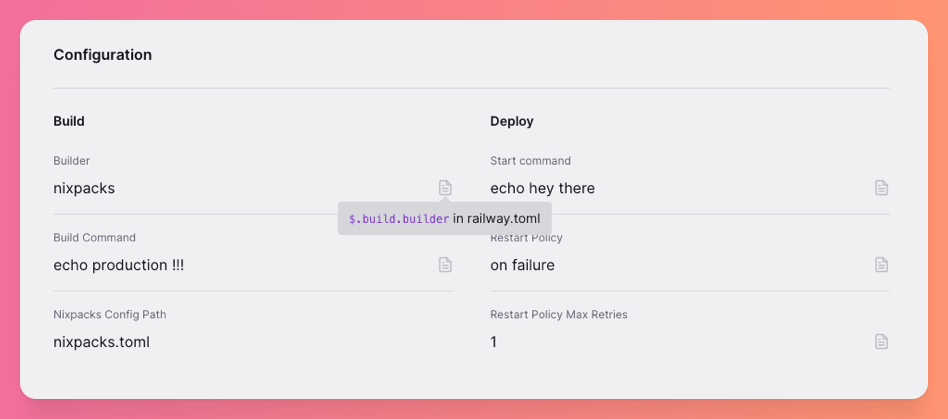
Config Source Location
On the deployment details page, all the settings that a deployment went out with are shown. For settings that come from a configuration file, there is a little file icon. Hovering over the icon will show exactly what part of the file the values originated from.
Configurable Settings
Specify the Builder
Set the builder for the deployment.
Possible values are:
NIXPACKSDOCKERFILE
Note: Railway will always build with a Dockerfile if it finds one. To build with nixpacks, you can remove or rename the Dockerfile.
Read more about Builds here.
Watch Patterns
Array of patterns used to conditionally trigger a deploys.
Read more about watch patterns here.
Build Command
Build command to pass to the Nixpacks builder.
This field can be set to null.
Read more about the build command here.
Dockerfile Path
Location of non-standard Dockerfile.
This field can be set to null.
More about building from a Dockerfile here.
Nixpacks Config Path
Location of a non-standard Nixpacks config file.
This field can be set to null.
Nixpacks Plan
Full nixpacks plan. See the Nixpacks documentation for more info.
This field can be set to null.
You can also define specific options as follows.
Custom Install Command
Use nixpacksPlan to configure a custom install command.
Nixpacks Version
EXPERIMENTAL: USE AT YOUR OWN RISK!.
Version of Nixpacks to use. Must be a valid Nixpacks version.
This field can be set to null.
Start Command
The command to run when starting the container.
This field can be set to null.
Read more about the start command here.
Number of Replicas
For horizontal scaling, the number of instances to run for the deployment.
This field can be set to null.
Read more about horizontal scaling here.
Healthcheck Path
Path to check after starting your deployment to ensure it is healthy.
This field can be set to null.
Read more about the healthcheck path here.
Healthcheck Timeout
Number of seconds to wait for the healthcheck path to become healthy.
This field can be set to null.
Read more about the healthcheck timeout here.
Restart Policy Type
How to handle the deployment crashing.
Possible values are:
ON_FAILUREALWAYSNEVER
Read more about the Restart policy here.
Restart Policy Max Retries
Set the max number of retries for the restart policy.
This field can be set to null.
Cron Schedule
Cron schedule of the deployed service.
This field can be set to null.
Setting Environment Overrides
Configuration can be overridden for a specific environment by nesting it in a
environments.[name] block.
When resolving the settings for a deployment, Railway will use this priority order:
- Environment specific config in code
- Base config in code
- Service settings
The following example changes the start command just in the production environment.
In a railway.toml file:
In a railway.json file:
PR Environment Overrides
Deployments for pull requests can be configured using a special pr environment. This configuration is applied only to deploys that belong to an ephemeral environment. When resolving the settings for a PR deployment, the following priority order is used:
- Environment with the name of the ephemeral environment
- Environment with the hardcoded name "pr"
- Base environment of the pull request
- Base config as code
- Service settings
Configuring a Build provider with Nixpacks
To define a build provider ahead of time, create a nixpacks.toml file and configure it like so:
Edit this file on GitHub