
Deploy a Ruby on Rails App
Rails is a Ruby full-stack framework designed to compress the complexity of modern web apps. It ships with all the tools needed to build amazing web apps on both the front and back end.
Create a Rails App
Note: If you already have a Rails app locally or on GitHub, you can skip this step and go straight to the Deploy Ruby on Rails App on Railway.
To create a new Rails app, ensure that you have Ruby and Rails installed on your machine. Once everything is set up, run the following command in your terminal:
rails new blog --database=postgresqlThis command will create a new Rails app named blog with PostgreSQL as the database config. Now, let’s create a simple "Hello World" page to ensure everything is working correctly.
-
Generate a Controller: Run the following command to create a new controller named
HelloWorldwith anindexaction:rails g controller HelloWorld indexThis will generate the necessary files for the controller, along with a view, route, and test files.
-
Update the Routes File: Open the
config/routes.rbfile and modify it to set the root route to thehello_world#indexaction:Rails.application.routes.draw do get "hello_world/index" # Define your application routes per the DSL in https://guides.rubyonrails.org/routing.html # Reveal health status on /up that returns 200 if the app boots with no exceptions, otherwise 500. # Can be used by load balancers and uptime monitors to verify that the app is live. get "up" => "rails/health#show", as: :rails_health_check # Render dynamic PWA files from app/views/pwa/* get "service-worker" => "rails/pwa#service_worker", as: :pwa_service_worker get "manifest" => "rails/pwa#manifest", as: :pwa_manifest # Defines the root path route ("/") root "hello_world#index" end -
Modify the View: Open the
app/views/hello_world/index.html.erbfile and replace its content with the following:<h1>Hello World</h1> <p> This is a Rails app running on Railway</p> -
Run the Application Locally: Start the Rails server by running:
bin/rails serverOpen your browser and go to
http://localhost:3000to see your "Hello World" page in action.
Now that your app is running locally, let’s move on to deploying it to Railway!
Deploy Ruby on Rails App on Railway
Railway offers multiple ways to deploy your Rails app, depending on your setup and preference. Choose any of the following methods:
One-Click Deploy from a Template
If you’re looking for the fastest way to get started, the one-click deploy option is ideal. It sets up a Rails app along with a Postgres database and Redis.
Click the button below to begin:

After deploying, we recommend that you eject from the template to create a copy of the repository under your own GitHub account. This will give you full control over the source code and project.
Deploy from the CLI
To deploy the Rails app using the Railway CLI, please follow the steps:
- Install the Railway CLI:
- Install the CLI and authenticate it using your Railway account.
- Initialize a Railway Project:
- Run the command below in your Rails app directory.
railway init - Follow the prompts to name your project.
- After the project is created, click the provided link to view it in your browser.
- Run the command below in your Rails app directory.
- Deploy the Application:
- Use the command below to deploy your app:
railway up - This command will scan, compress and upload your app's files to Railway. You’ll see real-time deployment logs in your terminal.
- Use the command below to deploy your app:
- Note: If you see an error about a missing
secret_key_basefor the production environment, don’t worry. We’ll fix this in the next step.
- Add a Database Service:
- Run
railway add. - Select
PostgreSQLby pressing space and hit Enter to add it to your project. - A database service will be added to your Railway project.
- Run
- Configure Environment Variables:
- Go to your app service Variables section and add the following:
SECRET_KEY_BASEorRAILS_MASTER_KEY: Set the value to the key from your local app'sconfig/master.key.DATABASE_URL: Set the value to${{Postgres.DATABASE_PUBLIC_URL}}(this references the URL of your new Postgres database). Learn more about referencing service variables.
- Use the Raw Editor to add any other required environment variables in one go.
- Go to your app service Variables section and add the following:
- Redeploy the Service:
- Click Deploy on the Railway dashboard to apply your changes.
- Verify the Deployment:
- Once the deployment completes, go to View logs to check if the server is running successfully.
Note: If your app has a Dockerfile (which newer Rails apps typically include by default), Railway will automatically detect and use it to build your app. If not, Railway will still handle the deployment process for you.
- Set Up a Public URL:
- Navigate to the Networking section under the Settings tab of your new service.
- Click Generate Domain to create a public URL for your app.

Deploy from a GitHub Repo
To deploy the Rails app to Railway, start by pushing the app to a GitHub repo. Once that’s set up, follow the steps below to complete the deployment process.
- Create a New Project on Railway:
- Go to Railway to create a new project.
- Deploy from GitHub:
- Select Deploy from GitHub repo and choose your repository.
- If your Railway account isn’t linked to GitHub yet, you’ll be prompted to do so.
- Select Deploy from GitHub repo and choose your repository.
- Add Environment Variables:
- Click Add Variables and configure all the necessary environment variables for your app.
- E.g
RAILS_ENV: Set the value toproduction. - E.g
SECRET_KEY_BASEorRAILS_MASTER_KEY: Set the value to the key from your app'sconfig/master.key.
- E.g
- Click Add Variables and configure all the necessary environment variables for your app.
- Deploy the App:
- Click Deploy to start the deployment process.
- Once the deployed, a Railway service will be created for your app, but it won’t be publicly accessible by default.
- Add a Database Service:
- Right-click on the Railway project canvas or click the Create button.
- Select Database.
- Select Add PostgreSQL from the available databases.
- This will create and deploy a new Postgres database service for your project.
- Configure Environment Variables:
- Go to your app service Variables section and add the following:
DATABASE_URL: Set the value to${{Postgres.DATABASE_URL}}(this references the URL of your new Postgres database). Learn more about referencing service variables.
- Use the Raw Editor to add any other required environment variables in one go.
- Go to your app service Variables section and add the following:
- Prepare Database and Start Server:
- Go to your app service Settings section.
- In the Deploy section, set
bin/rails db:prepare && bin/rails server -b ::as the Custom Start Command. This command will run your database migrations and start the server.
- In the Deploy section, set
- Go to your app service Settings section.
- Redeploy the Service:
- Click Deploy on the Railway dashboard to apply your changes.
- Verify the Deployment:
- Once the deployment completes, go to View logs to check if the server is running successfully.
Note: During the deployment process, Railway will automatically detect that it’s a Rails app.
- Set Up a Public URL:
- Navigate to the Networking section under the Settings tab of your new service.
- Click Generate Domain to create a public URL for your app.
This guide covers the main deployment options on Railway. Choose the approach that suits your setup, and start deploying your Rails apps effortlessly!
Next, we'll cover how to set up workers and cron jobs for your Rails app on Railway.
Set Up Workers & Cron Jobs with Sidekiq
Sidekiq is a powerful and efficient background job processor for Ruby apps, and it integrates seamlessly with Rails. Follow the instructions below to configure and run Sidekiq in your Rails app on Railway:
-
Install Sidekiq
- Start by adding
sidekiqandsidekiq-cronto your Rails app. In your terminal, run the following command:bundle add sidekiq bundle add sidekiq-cron
- Start by adding
-
Add a Redis Database Service
- Sidekiq uses Redis as a job queue. To set this up:
- Right-click on the Railway project canvas or click the Create button.
- Select Database.
- Select Add Redis from the available databases.
- This will create and deploy a new Redis service for your app.
- Sidekiq uses Redis as a job queue. To set this up:
-
Create and Configure a Worker Service
- Now, set up a separate service to run your Sidekiq workers.
- Create a new Empty Service and name it Worker Service.
- Go to the Settings tab of this service to configure it.
- In the Source section, connect your GitHub repository to the Source Repo.
- Under the Build section, set
bundle installas the Custom Build Command. This installs the necessary dependencies. - In the Deploy section, set
bundle exec sidekiqas the Custom Start Command. This command will start Sidekiq and begin processing jobs. - Click on Variables at the top of the service settings.
- Add the following environment variables:
RAILS_ENV: Set the value toproduction.SECRET_KEY_BASEorRAILS_MASTER_KEY: Set this to the value of your Rails app’s secret key.REDIS_URL: Set this to${{Redis.REDIS_URL}}to reference the Redis database URL. This tells Sidekiq where to find the job queue. Learn more about referencing service variables.- Include any other environment variables your app might need.
- Click Deploy to apply the changes and start the deployment.
- Now, set up a separate service to run your Sidekiq workers.
-
Verify the Deployment:
- Once the deployment is complete, click on View Logs. If everything is set up correctly, you should see Sidekiq starting up and processing any queued jobs.
-
Confirm All Services Are Connected:
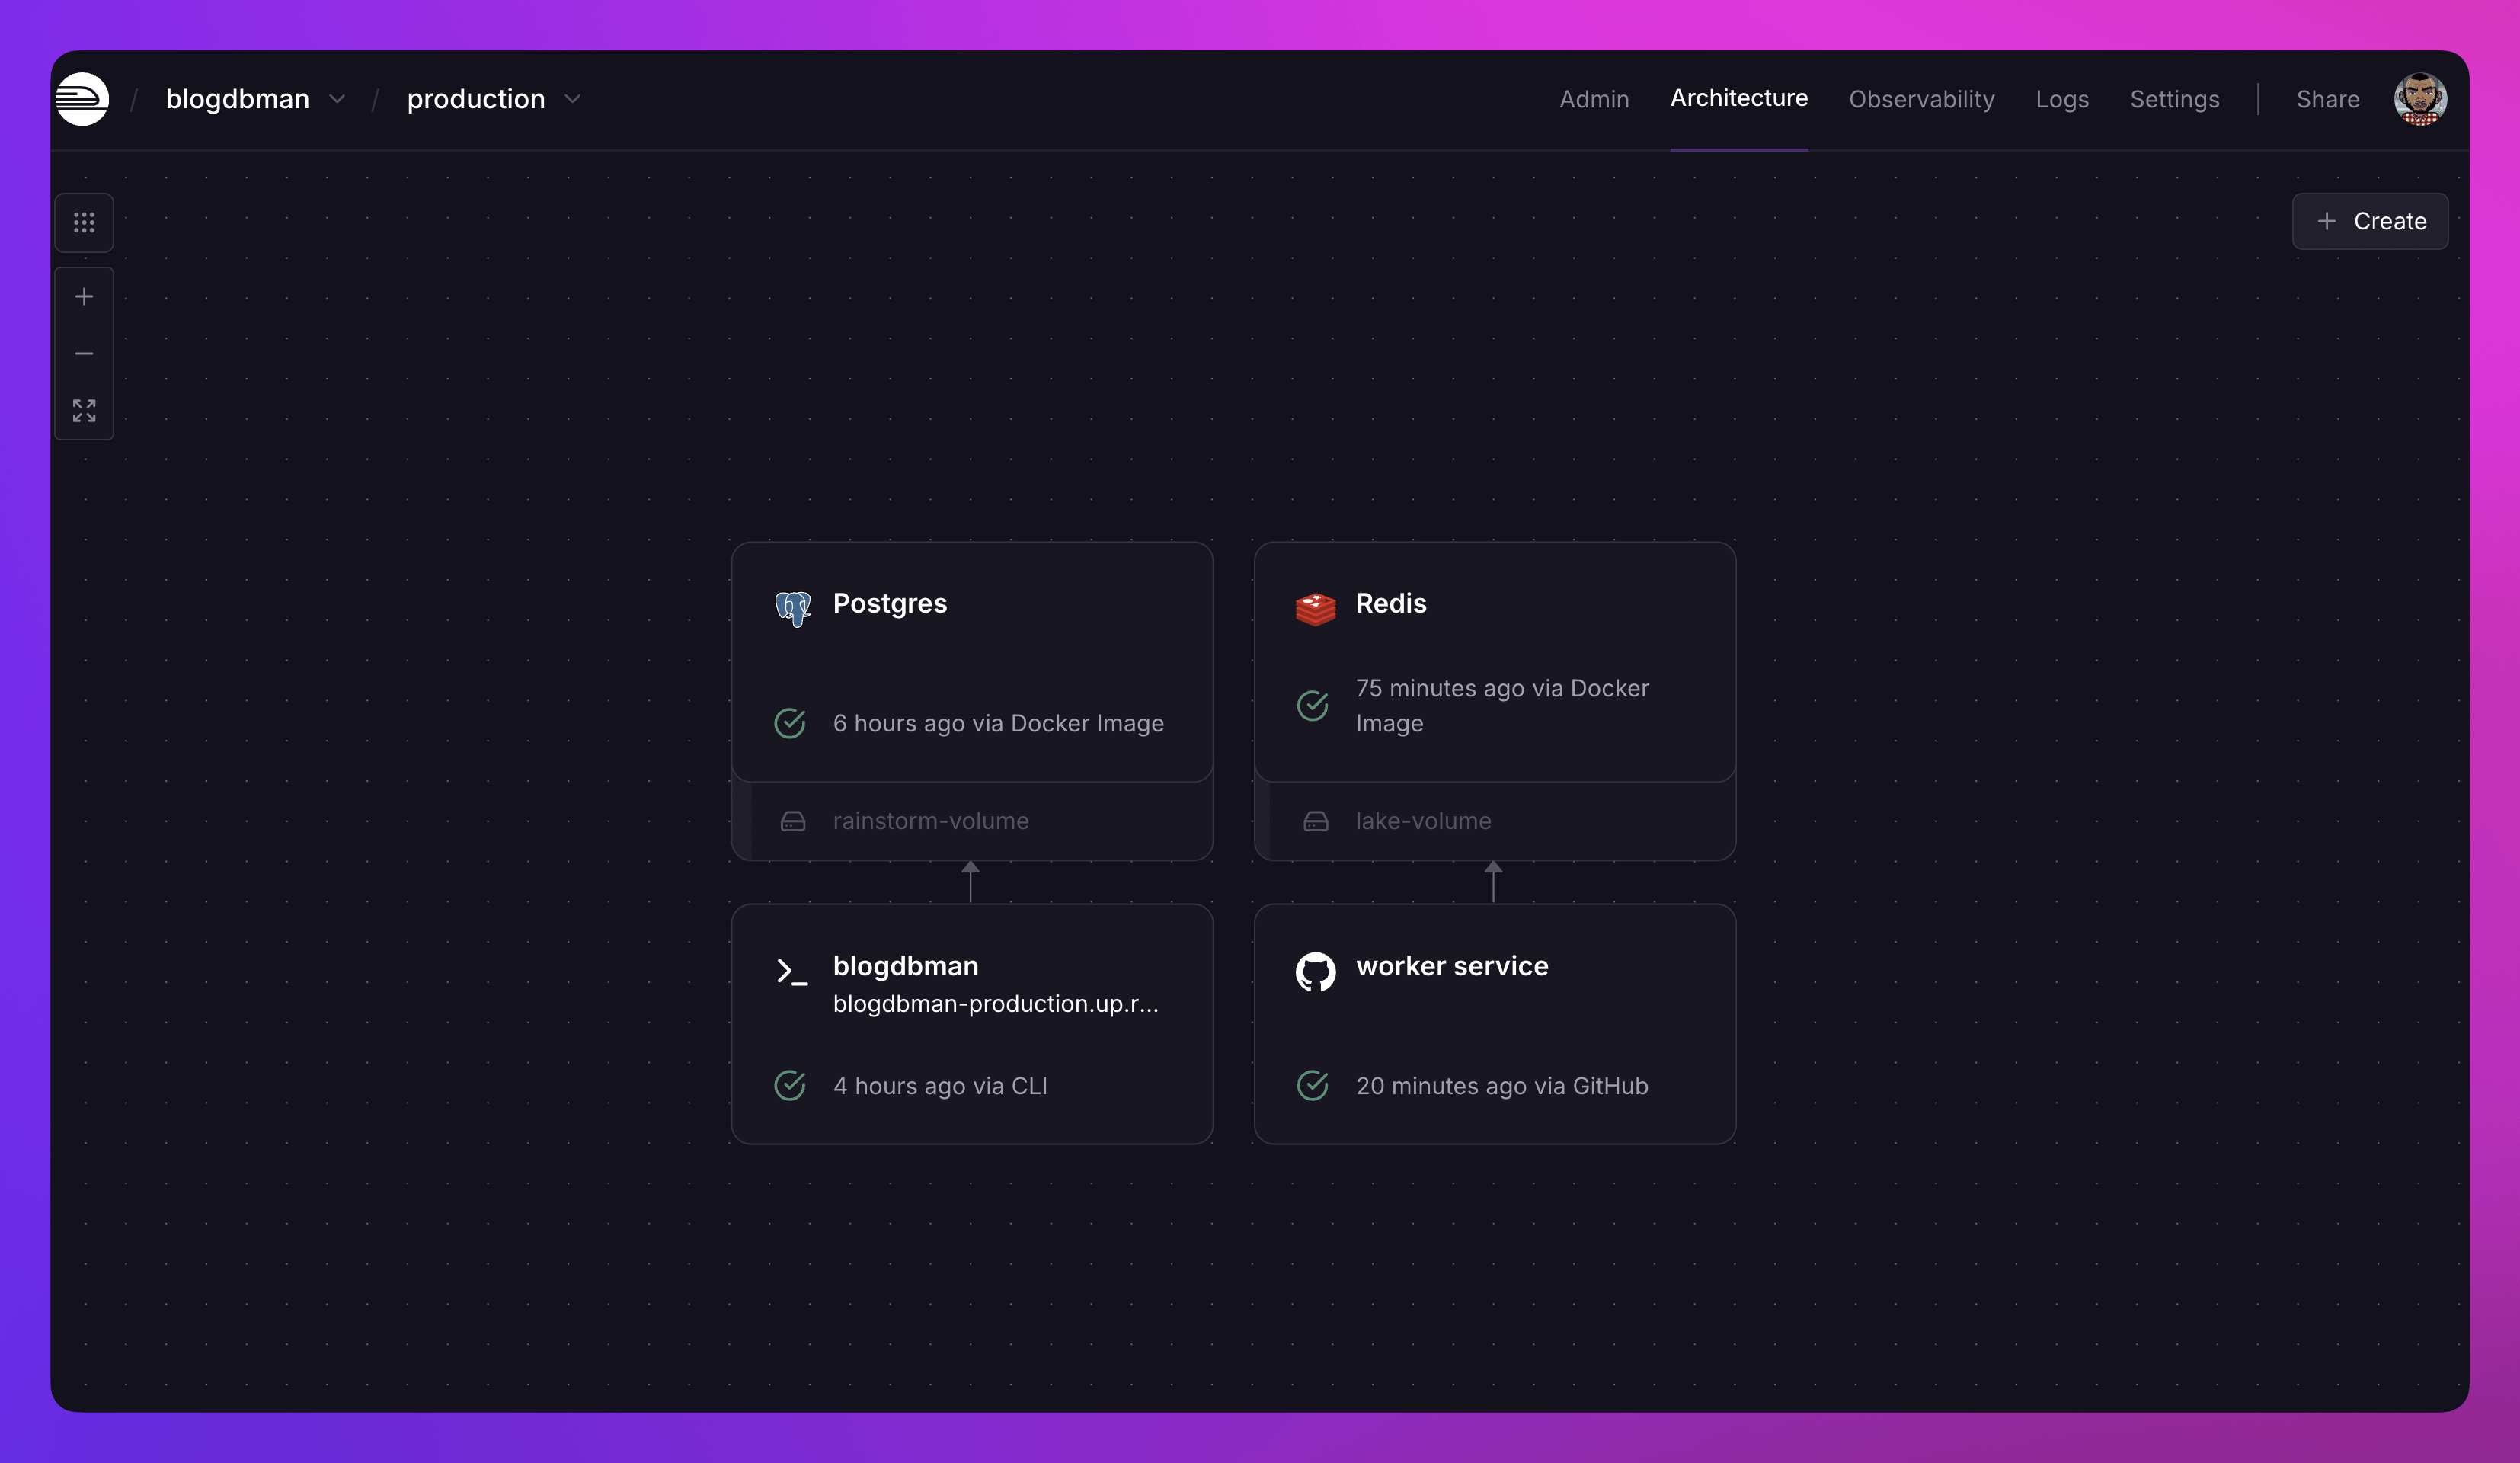
- At this stage, your application should have the following services set up and connected:
- App Service: Running the main Rails application.
- Worker Service: Running Sidekiq to process background jobs.
- Postgres Service: The database for your Rails app.
- Redis Service: Used by Sidekiq to manage background jobs
- At this stage, your application should have the following services set up and connected:

Here’s how your setup should look:
By following these steps, you’ll have a fully functional Rails app with background job processing using Sidekiq on Railway. If you run into any issues or need to make adjustments, check the logs and revisit your environment variable configurations.
Next Steps
Explore these resources to learn how you can maximize your experience with Railway:
Edit this file on GitHub